Wednesday, December 18, 2019

Mathanga Pappadam Erissery

 Erissery, a traditional Kerala dish, an unavoidable member of the Kerala sadya is usually made by adding ground coconut paste to cooked vegetables like pumpkin, yam etc and then finally seasoned with roasted coconut along with the regular seasoning of mustard, curry leaves etc. This erissery is somehow a little different and in a way a more easier version of the traditional erissery. Another dish which I learnt from Jayasri Chechi. Here instead of coconut paste, coconut milk is being added and along with the seasoning of roasted coconut, we are adding fried pappad bits too which gives such a delectable taste to the dish. Over to the recipe of Mathanga(pumpkin) pappadam erissery.


Ingredients
1 onion chopped
2 Tbsp coconut oil
250 gms pumpkin, peeled and cut into cubes
1-2 whole red chillies
1/4 tsp turmeric powder
1 tsp chilli powder
1 cup thick coconut milk(can use fresh, canned or coconut milk powder diluted in 1 cup water)
salt to taste

For the seasoning
1-2 Tbsp coconut oil
2-3 pappad- torn into bits
1/4 tsp mustard seeds
1 red chilli
few curry leaves
2 Tbsp grated coconut

Method
  •  Heat a kadai/pan and add the coconut oil. Add the chopped onion and saute until translucent.
  • Break the red chillies and add them to the onion. Fry for a few seconds.
  • Toss in the pumpkin pieces and mix well.
  • Add the turmeric powder, chilli powder. Reduce the heat and fry for a few seconds.
  •  Pour in the coconut milk. Mix well.
  • Add salt to taste and mix again.
  • Cover and cook on low flame for 10 minutes or until the pumpkin is cooked. Switch off the heat and keep aside.
For seasoning
  • Tear the pappad into small bits and keep aside.
  • Heat the coconut oil in another pan. Add the mustard seeds and as they start to crackle, add the red chilli broken into pieces and curry leaves.
  • Add the grated coconut and fry until the coconut turns golden brown. Add this to the prepared pumpkin curry.
  • To the same pan add 1 tbsp oil and the pappad pieces. Fry until the pappad pieces puffs up. Add this also to the curry and cover immediately so as to lock in the flavours.
  • Open after 2-3 minutes, mix and serve with steamed rice.

Wednesday, December 11, 2019

Paneer Bhurji

Ingredients
2 tbsp oil
1/4 tsp cumin seeds
1 medium onion, chopped fine
1 tsp ginger- garlic paste
2 green chilies chopped
1 tomato chopped
1/4 tsp turmeric powder
1/2 tsp cumin powder
salt to taste
300 gms paneer/cottage cheese, crumbled
chopped coriander leaves to garnish


Method

  • Heat oil in a pan.  Add the cumin seeds and as it sizzles add the chopped onion. Saute well.
  • Add the ginger-garlic paste and saute again until the raw smell goes.
  • Now add the green chilies and tomato and saute well.
  • Add the turmeric powder, cumin powder, and 2 Tbsp water and fry everything well until the water is absorbed and the oil layer starts to show.
  • Add salt to taste and mix well.
  • Meanwhile, crumble the paneer and add. mix well and fry for 2-3 minutes.
  • Finally, add the chopped coriander leaves. Mix and serve hot.

Wednesday, December 04, 2019

Parippu Kuthikaachiyathu

Some dishes are like that...they don't need a description. I am sure many of my Keralite friends out there must be familiar with this simple dal/parippu curry. Something that can be had and made anytime and in no time. For my non- Keralite friends who are wondering what this dish is and means is, well, it's nothing but dal seasoned with crushed shallots, red chilies, and curry leaves fried in coconut oil. A nostalgic feel comes when this is poured over hot matta rice with some stir fry/mezhukupuratti, a kadumanga /tender mango pickle and if you can get a pappad also then it's nothing but pure bliss!. Today as I made this curry I decided to replenish those memories by serving it in a steel tiffin box with all the accompaniments I mentioned above, dumped and stuffed into it. Sometimes do try having like that...it gives a different feel:))
Ingredients
1 cup toor/tuvar dal
1 tomato chopped
salt to taste
1/2 tsp turmeric powder
8-10 shallots
3-4 whole red chillies
2 Tbsp coconut oil
few curry leaves

Method

  • Into a pressure cooker add the toor dal. Wash it well, draining the water and washing again 2-3 times.
  • Now add water(as much required to cook the dal. Basically the water level should be just one inch above the dal. I added approximately 1 1/2 glass of water).
  • Add the tomato, turmeric powder and salt to the cooker. Mix everything well and close the cooker. Put on the weight.
  • Cook until the cooker gives off 2 to 3 whistles. Remove from heat and keep aside. Allow the steam to settle on its own.
  • In the meantime crush the shallots and the red chilies in a mortar and keep aside.
  • Once the steam has settled, open the cooker and mix everything well. 
  • In a pan heat the coconut oil and fry the crushed shallots and red chilies along with a few curry leaves until the shallots turn golden brown.
  • Add this to the prepared dal and mix everything well.
  • Serve hot with rice, a stir fry, pickle, and pappad. A typical lunch menu of a home in Kerala.


Wednesday, November 27, 2019

Garlic Bread

Homemade garlic bread with cheese, that can be easily made with no compromise on the taste. Tasty and flavorful with the crisp edges, buttery center, lemony zest, Italian punch with the addition of oregano and topped with gooey mozzarella cheese. This is simply yumm...

Those who don't have an oven, can place the bread slices on a heated pan and cook it covered on a low heat until the cheese melts.
 Ingredients
2 Tbsp softened unsalted butter
1 clove garlic minced
1 Tbsp olive oil
1 Tbsp lemon juice
a pinch of oregano
6 bread slices
grated mozzarella cheese(optional)


Method

  • Into a bowl add the butter, garlic, olive oil, lemon juice, and oregano. Mix everything well.
  • Preheat oven to 200-degree celsius for 10 minutes
  • Arrange the bread slices on a baking tray.
  • Spread the prepared garlic butter on each slice.
  • Sprinkle mozzarella cheese on each slice.
  • Bake for 10 minutes or until the cheese melts.
  • Serve hot sliced into triangles or strips.


*Adding the mozzarella cheese is purely optional.
*Best to be served with soup, pasta, etc.

Wednesday, November 20, 2019

Cheera Masiyal


I had long before shared a post on Palak Masiyal. Now, this recipe is the same as that, the only difference being that here red spinach/ cheera is being used in place of palak. I happened to taste this dish long before from our family friend Jaysree chechi's place. I fell in love with it and immediately asked her how this was done. She told me it was one dish that her mom, grandmom and all used to make. So it was a recipe passed on from one generation to the next and somehow these kinds of recipes passed on from the older generations have always tasted the best for me. I deeply believe that such inherited recipes should be captured and the baton should be passed on to the coming generations too. So this has to be recorded somewhere and that's why I try to treasure such recipes and keep them. Now this recipe too like many other recipes may have different versions in different places, but as for me, this was how I tasted it and this was how I liked it! Something which I frequently make. So over to the recipe of  Cheera Masiyal


Watch how to make it 


Ingredients
2 cups chopped red spinach
1 onion chopped
2 Tbsp coconut oil
2 whole red chilies
1/4 tsp turmeric powder
3/4 tsp chili powder
3-4 pappads
salt to taste

Method
  • Heat the coconut oil in a pan.
  • Add the chopped onion and saute well.
  • Break the chilies and add them to the onion. Fry for a few seconds.
  • Add turmeric powder and chili powder. Fry until the raw smell goes.
  • Tear the pappads into small bits and add. Fry until the pappad pieces get roasted slightly.
  • Now add the spinach and salt. Mix well.
  • Reduce the heat and cook covered for 2-3 minutes. The spinach will shrink and release water.
  • Open and saute until the water is almost absorbed. 
  • Serve with rice and any curry of your choice.

Wednesday, November 13, 2019

Chicken Bharta


Chicken Bharta is a dish made with minced chicken or with boneless chicken cut into small pieces. I also happened to read somewhere that this dish was made in the dhabas(Indian roadside food stalls) where to use up the leftover chicken this dish was created. Don't know how far this is true but whatever, it's a yummy dish and whoever created this has indeed done a beautiful job by creating such an enticing chicken dish. A delectable North Indian curry with an enhancing taste that leaves you craving for more.

Watch how to make it 


This recipe was shared by a friend who in turn happened to try it out from a video by Home Cooking. So it’s a recipe which was tried, loved and passed on J


Ingredients
300 gms boneless chicken, minced or cut into small pieces
3 onions chopped really fine
1-2 Tbsp oil
1+1 tsp ghee
1 bay leaf
4 cloves
1 cinnamon
2 cardamom
1 1/2 Tbsp ginger garlic paste
2 tomatoes, chopped
2 tsp kashmiri chili powder
salt to taste
1 tsp cumin powder
2 tsp coriander powder
1 tsp garam masala powder
1 tsp tandoori masala powder
2 Tbsp cashew paste(soak 10-15 cashew nuts in water for 5-10 minutes & grind them into a paste)
1/2 cup yogurt/curd
1 tsp kasoori methi
1 Tbsp cream
1 Tbsp chopped coriander leaves

Method

  • Heat a pan. Pour oil followed by 1 tsp ghee into the pan.
  • As the oil ghee mixture gets heated, add the bay leaf, cloves, cinnamon and cardamoms to it. 
  • Then add the finely chopped onion. Saute for 1-2 minutes and then add the ginger-garlic paste.
  • Fry until the raw smell goes and the onion starts turning golden brown in color.
  • Now add the chopped tomatoes, mix well and cover and cook on a medium-low flame for 2-3 minutes or until the tomatoes turn mushy.
  • Now add the turmeric powder, chili powder, and salt. Saute everything well for about 1 minute.
  • Add the chicken and mix well.
  • Add the cumin powder, coriander powder and mix well. Add a little hot water so that all the masalas get mixed well. Cover and cook on a low flame for 15 minutes.(Stir once or twice in between)
  • Open and then add the garam masala powder and tandoori masala powder. Mix everything well and saute for 1-2 minutes.
  • Then add the cashew paste. Mix and then add the yogurt. Give a thorough mix and cook for 2-3 minutes stirring continuously.
  • Add the remaining 1 tsp ghee. Crush kasoori methi between your palms and add to the dish.
  • Mix everything well and finally add the cream.
  • Garnish with chopped coriander leaves.
  • Serve hot with butter naan, tandoori roti, rumali roti, chappati or plain steamed basmati rice.

Wednesday, November 06, 2019

Schezwan Paneer


The Schezwan sauce is a versatile ingredient of the Indo- Chinese cuisine.  We have seen a number of dishes like the schezwan chicken, schezwan beef, schezwan fried rice and so on. It can also be added to some dips or used as such as a side if you prefer a spicy tangy element to every bite of what you are having. The schezwan sauce can be made easily at home as its recipe doesn't seem to be that difficult to whip up. But if you are someone like me who turns to be extremely lazy at times you can go for the store-bought ones too. Of the store-bought ones, one of my personal favorites is the Ching's Schezwan Chutney(this is not any sort of product promotion but just sharing my personal favorite).
This is a super easy recipe using the store-bought schezwan chutney. If you have just less than half an hour's time to cook a dish then this one is just for you. Grab a bottle of schezwan sauce or chutney the next time you go shopping and keep it handy, as this ingredient really helps you out in those stressful days of cooking. One successful dish of my kitchen experiments is this schezwan paneer recipe that I am sharing here.
Watch how to make it 


Ingredients
300 gm paneer(fresh or frozen, if you can get malai paneer then it tastes the best)
2 Tbsp oil
1 tsp sugar
2 green chilies, chopped
5-6 garlic cloves, chopped
1 onion chopped fine
1/2 capsicum chopped fine
1 Tbsp soy sauce
1Tbsp chili sauce(green or red)
1 Tbsp tomato ketchup
1 Tbsp schezwan chutney(I used Ching's brand)
salt to taste
1/2 tsp pepper 

Method

  • Heat oil in a pan. Add the sugar and allow it to caramelize.
  • Add the green chilies and garlic and fry for a few seconds
  • Then add the onion and capsicum. Fry for a few seconds.
  • In the meantime, in a bowl mix soy sauce, chili sauce and tomato ketchup. Pour this into the onion mix and fry for a few seconds.
  • Now add the schezwan chutney and mix well.
  • Add salt to taste(adjust salt as soy sauce already has salt in it).
  • Mix everything well and then toss in the paneer. 
  • Mix well so that the sauces coat the paneer pieces well.
  • Cover and cook for just 1-2 minutes. (If you cook paneer for more time it tends to get hard unless you are using malai paneer)
  • Finally, add the pepper powder, mix well and serve.
  • Can be served with fried rice, pulao or can even be used as a filling for rolls or sandwiches.


  • I have used frozen paneer here. Just soaked it in water for a few minutes, drained and added to the dish. The spice level of this dish is on a higher side. For those who would not prefer a spicy version can reduce the number of green chilies and pepper.
  • You can also prepare this dish by omitting the onion and capsicum(I have tried it that way too), that gives a different taste but still it's not bad either. So in case, you don't have onion or capsicum you can try making this by skipping either one or both. It still tastes nice:)
  • You can even add the onions and capsicum as big square cuts too if you like that crunch they impart.


Wednesday, October 30, 2019

Mint Margarita


There are certain days when there is a longing to have something cool, and refreshing. Something which cools both inside out. The smell of mint leaves itself gives that feeling. This aromatic, green, distinctly flavorful herb is one that comes to rescue at those moments. Its combination with lemon is truly a heart winner.

Watch how to make it here !!!


Serves 2

Ingredients

A handful of mint leaves
juice of 1 small lemon
2 Tbsp sugar(add more if you prefer more sweetness) or 2 Tbsp honey
a pinch of salt
sparkling water/soda
few ice cubes


Method
  • In a blender add the mint leaves, lemon juice, sugar, salt, ice cubes, and blend.
  • Prepare the serving glasses by rubbing the lemon wedge along the rim of the glass. then roll the rim of the glass in sugar crystals so that the sugar gets stuck along the rim of the glass.
  • Add 1 to 2 tsp of the blended mix into each glass.
  • Pour sparkling water/soda and fill the glass.
  • Serve immediately.


Wednesday, October 23, 2019

Quick Shahi Tukda

Wishing everyone a Happy Diwali in advance!!!

Shahi Tukda or is it Shahi Tukray? Well, I am still confused about that! Having done some research about this royal dessert, the information that I came across was that this rich dessert prepared by frying small pieces of bread in ghee, dipped in saffron infused sugar syrup and topped with rich rabdi(thickened or reduced creamy milk) and garnished with dry fruits, has its roots from the early Mughal period. Literally, the word Shahi means royal and tukda means piece or bite. So basically put together it means that if you are having shahi tukda then you are having a royal piece or royal bite.!
Preparation of this royal delicacy is not that difficult except for the part where you have to prepare the rabdi. Rabdi preparation does require a little bit of patience and it does take up some of your time as the milk has to reduce and condense to impart the creamy flavor which is the key ingredient of this delicacy that has elevated it to the royal level.  Well, as in my quest to find easy solutions to such complex situations I came across this recipe where you can prepare this whole dish in..maybe less than 15-20 minutes. Yes, the rabdi process is quickened over here by adding a secret ingredient..no not just condensed milk!! Please go through the recipe and watch the video to find out how to present this royal Mughal dessert on your dining table as an exquisite dessert after dinner or to highlight your festival season with a royal touch.


Watch how to make this by clicking here


Ingredients
For the quick rabdi
  • 1 1/2 cup full-fat milk
  • 1/4 cup condensed milk
  • 1 bread slice
  • 1/4 tsp cardamom powder
For the fried bread
  • 2 slices of bread
  • 3 Tbsp ghee
For the sugar syrup
  • 1/2 cup sugar
  • 1/4 cup water
  • few strands of saffron
few almonds slices for garnish

Method of making the quick rabdi
  • Remove the crust of the fresh slice of bread and cut it into pieces.
  • Grind these pieces in a food processor to get fresh bread crumbs. Keep it aside.
  • In a heavy-bottomed wide pan bring the milk to a boil. Scrape the sides of the pan as the milk boils.
  • Add the condensed milk and mix well.
  • Add the bread crumbs and cook stirring continuously until the milk thickens. Don't forget to scrape the sides of the pan and mix it with the thickening milk.
  • Add the cardamom powder and mix well. Rabdi is ready.
  • Refrigerate the rabdi until ready to serve with the bread.

Method of making the fried bread
  • Remove the crust of the bread slices and cut each slice into four triangles.
  • Heat ghee in a pan. Fry the bread pieces until golden brown on both sides and keep aside.

Method of making the sugar syrup
  • Mix sugar and water in a broad pan and cook on high heat until the sugar dissolves.
  • Simmer for a few minutes to get a syrup consistency.
  • Add the saffron strands and mix.
Serving the shahi tukda
  • Soak the fried bread pieces in the sugar syrup(while the syrup is still warm) for 5-10 minutes(the soaking time depends on how crisp or soft you want the bread slices to be. The more time you soak softer they will be. For those who prefer crisp bread , soak for lesser time)
  • Arrange the soaked bread slices on the serving plate and pour the prepared rabdi on top of the bread pieces.
  • Garnish by sprinkling some sliced almonds. Serve!

Wednesday, October 09, 2019

Coconut Milk Chicken Roast

Now, this is a super quick and easy recipe. A recipe that just calls for three basic ingredients- chicken, coconut milk and chili powder. No onions, ginger, garlic or anything of that sort.  A very very very easy recipe and really yummy too. Don't hesitate in trying out this assuming that it might not taste good without many ingredients because this was the doubt that I had when Tessa told me about this recipe. She assured me that her friend Irshad made this in front of her and it tasted awesome!! So that's how this chicken dish was tried and it was truly lip-smacking. Since then I have made this umpteen number of times as it is a favorite at home now.
I have made it with boneless chicken here(as that was what I had with me in stock) but you can make this with chicken with bones too, it tastes equally good or maybe even better!
And as for the coconut milk, you can very well use the canned coconut milk or coconut milk powder(approximately 7-8 spoons in 1 1/2 cup of water), if you can't get hold of fresh coconut milk.
This is a spicy dish, the amount of chili powder can be altered according to your spice level interest but though the amount of chili powder appears to be more, it gets totally balanced with the sweetness of coconut milk.

Watch how to make this dish in our youtube channel - Droolsss by clicking here

Ingredients
250 gms chicken cut into small pieces(boneless or with bone)
2 Tbsp coconut oil
1 1/2 tbsp kashmiri chili powder(adjust amount as per your taste)
1 1/2 cup coconut milk
salt to taste
few curry leaves sliced(for garnish)

Method
  • Heat a pan. Add the oil followed by the chili powder. Fry the chili powder for a few seconds(take care not to burn it).
  • Pour the coconut milk to the roasted chili and as it begins to boil, add the chicken pieces. 
  • Add salt to taste and mix well.
  • Cover and cook on a medium-low flame for approximately 5-7 minutes(If you are using chicken with bones cook for a few minutes more. Here I have used tender boneless chicken, which takes very little time to get cooked.)
  • Open and keep cooking stirring every now and then until the coconut milk is totally absorbed into the chicken pieces and the dish turns into a reddish-brown color.
  • Serve hot garnished with sliced curry leaves.
You can modify this dish by adding finely chopped onion, garlic, ginger etc. after adding the chili powder for a different taste. If you have time in hand you can try experimenting!!But if you are a busy person who has no time for all the cutting and chopping, then go ahead and give this a try as such:)


Tuesday, March 19, 2019

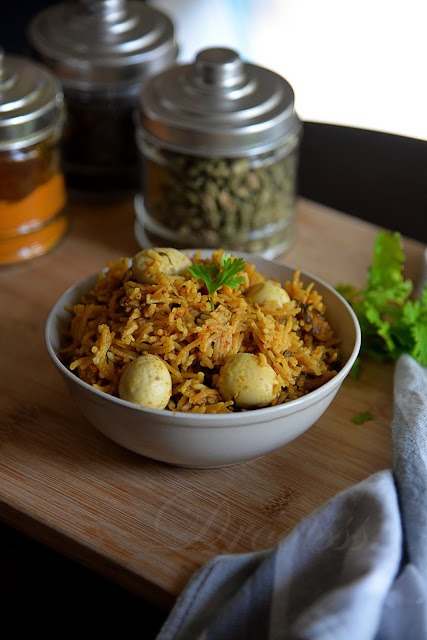
Quail Egg Biriyani/Kada mutta Biriyani

Cute little eggs, lying in aromatic basmati rice cooked in coconut milk and all the exotic Indian spices makes this biriyani a total crowd pleaser. Staying quite apart from the traditional biriyani cooking methods, this biriyani is quite on the easier side as it doesn't involve the 'dum' process and moreover can be said to be a dish that can be made at a short notice too.

Quail eggs or kada mutta though small and cute can never be underestimated with regard to its size. These little eggs are power packed in every sense. As these eggs are small in size, there comes a tendency to consume more of them. But the nutritional value of these eggs is 3-4 times higher than the normal chicken eggs. So though you wish to have more, it is advised not to have more though.
So when you make a normal egg roast or egg curry with these eggs, it is quite natural to feel the discontentment of not having as much as the heart desires to have. So then this is the way that I felt is better to have these eggs. Make a biriyani with them!


Ingredients

15 quail eggs
2 cups basmati rice
2 tsp garlic paste
2 tsp ginger paste
5-6 Tbsp ghee or oil
2 onions sliced thin
2 green chilies chopped
4 Tbsp mint leaves, chopped
1/2 cup tomato puree
1/2 tsp turmeric powder
2 tsp lemon juice
2 tsp Kashmiri chili powder
1 tsp crushed black pepper
1 tsp garam masala powder
1 star anise
2 bay leaves
1/2 tsp fennel seeds
3-4 cardamom
4 cloves
1 inch cinnamon stick
4 cups thin coconut milk
1 chicken stock cube


Method

  • Hard boil the eggs, shell them and keep aside.
  • Soak the basmati rice in water for half an hour. Drain and keep aside.
  • Heat ghee in a pan. Add star anise, bay leaves, fennel seeds, cardamom, cloves and cinnamon stick.  Saute until a nice aroma comes.
  • Add the onions and green chilly and fry until the onions start turning golden brown.
  • Add the ginger paste and garlic paste. Fry until the raw smell goes.
  • Then add the tomato puree and cook until the oil starts leaving from the sides of the pan.
  • Add the chopped mint leaves, chili powder, turmeric powder, crushed black pepper, garam masala powder and the chicken stock cube. Mix everything well and cook on a low flame for 3-4 minutes.
  • Toss in the boiled eggs and mix everything well. Cook for 1-2 minutes.
  • Now add the soaked basmati rice. Mix well and saute for 1 minute.

  • Add the thin coconut milk. Mix well. Check salt and add just as much required(As the chicken stock has salt, adjust the salt accordingly). The water must taste salty so that when the rice gets cooked the salt taste will be balanced.
  • Allow this to boil, add the lemon juice. Cover and cook on a low flame until the water is absorbed by the rice and the rice is cooked to perfection. Switch off the heat and allow the biriyani to remain covered in the pan for 5 minutes. Then open and fluff up the rice with a fork.
  • Serve the quail egg biriyani with yogurt based salads.


Thursday, February 21, 2019

Punjabi Samosa


Ingredients

For the dough
1 cup all-purpose flour/maida
2 Tbsp oil or ghee
1/4 tsp carom seeds/ajwain
salt to taste

For the filling
2 medium potatoes -boiled and mashed
1/4 cup green peas- boiled or thawed frozen green peas
2 Tbsp oil
1 tsp coriander seeds- crushed slightly
1/8 tsp asafoetida/hing
1/2 tsp cumin seeds
1 tsp fennel seeds
1 tsp green chilies crushed
1/2 tsp ginger crushed
1 tsp garam masala powder
1/2 tsp amchoor powder/dried mango powder
salt to taste

oil for frying

Method

Making the dough

  •  Add the flour, carom seeds and salt to a deep bowl and mix. Now add the oil or ghee and mix well with your hands so that you get a crumbled texture(this step is very important in the making of samosas as this ensures that you get a smooth, non-bubbly and flaky outer texture).
  • Now add water little by little and knead until you get a stiff dough(the dough should not be very soft, as then the samosas will drink up a lot of oil while frying)
  • Cover the dough with a damp kitchen towel and keep aside.

Making the filling


  • Heat 2 Tbsp oil in a pan. Add the cumin seeds, fennel seeds, and crushed coriander seeds. Saute for 1-2 seconds and then add the crushed green chilies and ginger and saute for a few seconds.
  • Add the mashed potato and mix well. Cook for 1 to 2 minutes stirring continously.
  • Add the green peas and salt and mix well. Cook on medium heat for a minute.
  • Add the amchoor powder and garam masala powder. Mix well stirring continuously until everything is combined well. Cook for 1-2 minutes and then switch off the heat.  Allow this mixture to cool down completely.
Making the samosa


  • Knead the dough well and make small balls of the dough(approximately 4 balls or you can make smaller ones for small samosas) and keep aside.
  • Roll out each ball into approximately 5-inch diameter circles(try not using any flour to dust while rolling out the circles, if the dough consistency is not soft, dusting of flour while rolling out won't be required).
  • Cut each circle in the center so that you get two semi-circles.
  • Take each semi-circle and bring the two edges along the straight line of the semi-circle together slightly overlapping each other so that you get the shape of a cone. Press the overlapping ends slightly so that the cone structure is maintained.
  • Now stuff little of the filling into the cone. Smear little water on the edges of the cone and seal them together so that stuffing is sealed inside the cone.
  • Do the same with the remaining dough and filling.
  • Deep fry the samosas in hot oil until golden brown on all sides and drain on to a kitchen towel.
  • Serve samosas with tomato ketchup or dates and tamarind chutney or mint chutney. And don't forget to have some masala tea too along with your hot samosas.